Hi developers,
And thanks a lot to TutorialPoints
Android has a built in microphone through which you can capture audio and store it , or play it in your phone. There are many ways to do that but the most common way is through MediaRecorder class.
Android provides MediaRecorder class to record audio or video. In order to use MediaRecorder class ,you will first create an instance of MediaRecorder class. Its syntax is given below.
MediaRecorder myAudioRecorder = new MediaRecorder();
Now you will set the source , output and encoding format and output file. Their syntax is given below.
myAudioRecorder.setAudioSource(MediaRecorder.AudioSource.MIC);
myAudioRecorder.setOutputFormat(MediaRecorder.OutputFormat.THREE_GPP);
myAudioRecorder.setAudioEncoder(MediaRecorder.OutputFormat.AMR_NB);
myAudioRecorder.setOutputFile(outputFile);
After specifying the audio source and format and its output file, we can then call the two basic methods perpare and start to start recording the audio.
myAudioRecorder.prepare();
myAudioRecorder.start();
Apart from these methods , there are other methods listed in the MediaRecorder class that allows you more control over audio and video recording.
Sr.No Method & description 1 setAudioSource()
This method specifies the source of audio to be recorded 2 setVideoSource()
This method specifies the source of video to be recorded 3 setOutputFormat()
This method specifies the audio format in which audio to be stored 4 setAudioEncoder()
This method specifies the audio encoder to be used 5 setOutputFile()
This method configures the path to the file into which the recorded audio is to be stored 6 stop()
This method stops the recording process. 7 release()
This method should be called when the recorder instance is needed.
Android has a built in microphone through which you can capture audio and store it , or play it in your phone. There are many ways to do that but the most common way is through MediaRecorder class.
Android provides MediaRecorder class to record audio or video. In order to use MediaRecorder class ,you will first create an instance of MediaRecorder class. Its syntax is given below.
MediaRecorder myAudioRecorder = new MediaRecorder();
Now you will set the source , output and encoding format and output file. Their syntax is given below.
myAudioRecorder.setAudioSource(MediaRecorder.AudioSource.MIC); myAudioRecorder.setOutputFormat(MediaRecorder.OutputFormat.THREE_GPP); myAudioRecorder.setAudioEncoder(MediaRecorder.OutputFormat.AMR_NB); myAudioRecorder.setOutputFile(outputFile);
After specifying the audio source and format and its output file, we can then call the two basic methods perpare and start to start recording the audio.
myAudioRecorder.prepare(); myAudioRecorder.start();
Apart from these methods , there are other methods listed in the MediaRecorder class that allows you more control over audio and video recording.
| Sr.No | Method & description |
|---|---|
| 1 | setAudioSource() This method specifies the source of audio to be recorded |
| 2 | setVideoSource() This method specifies the source of video to be recorded |
| 3 | setOutputFormat() This method specifies the audio format in which audio to be stored |
| 4 | setAudioEncoder() This method specifies the audio encoder to be used |
| 5 | setOutputFile() This method configures the path to the file into which the recorded audio is to be stored |
| 6 | stop() This method stops the recording process. |
| 7 | release() This method should be called when the recorder instance is needed. |
Example
This example provides demonstration of MediaRecorder class to capture audio and then MediaPlayer class to play that recorded audio.
To experiment with this example , you need to run this on an actual device.
Steps Description 1 You will use Eclipse IDE to create an Android application and name it as AudioCapture under a package com.example.audiocapture. While creating this project, make sure you Target SDK and Compile With at the latest version of Android SDK to use higher levels of APIs. 2 Modify src/MainActivity.java file to add AudioCapture code 3 Modify layout XML file res/layout/activity_main.xml add any GUI component if required. 4 Modify res/values/string.xml file and add necessary string components. 5 Modify AndroidManifest.xml to add necessary permissions. 6 Run the application and choose a running android device and install the application on it and verify the results.
Here is the content of src/com.example.audiocapture/MainActivity.java
package com.example.audiocapture;

import java.io.File;
import java.io.IOException;

import android.media.MediaPlayer;
import android.media.MediaRecorder;
import android.os.Bundle;
import android.os.Environment;
import android.app.Activity;
import android.view.Menu;
import android.view.View;
import android.widget.Button;
import android.widget.Toast;

public class MainActivity extends Activity {

   private MediaRecorder myAudioRecorder;
   private String outputFile = null;
   private Button start,stop,play;
   @Override
   protected void onCreate(Bundle savedInstanceState) {
      super.onCreate(savedInstanceState);
      setContentView(R.layout.activity_main);
      start = (Button)findViewById(R.id.button1);
      stop = (Button)findViewById(R.id.button2);
      play = (Button)findViewById(R.id.button3);

      stop.setEnabled(false);
      play.setEnabled(false);
      outputFile = Environment.getExternalStorageDirectory().
      getAbsolutePath() + "/myrecording.3gp";;

      myAudioRecorder = new MediaRecorder();
      myAudioRecorder.setAudioSource(MediaRecorder.AudioSource.MIC);
      myAudioRecorder.setOutputFormat(MediaRecorder.OutputFormat.THREE_GPP);
      myAudioRecorder.setAudioEncoder(MediaRecorder.OutputFormat.AMR_NB);
      myAudioRecorder.setOutputFile(outputFile);

   }

   public void start(View view){
      try {
         myAudioRecorder.prepare();
         myAudioRecorder.start();
      } catch (IllegalStateException e) {
         // TODO Auto-generated catch block
         e.printStackTrace();
      } catch (IOException e) {
         // TODO Auto-generated catch block
         e.printStackTrace();
      }
      start.setEnabled(false);
      stop.setEnabled(true);
      Toast.makeText(getApplicationContext(), "Recording started", Toast.LENGTH_LONG).show();

   }

   public void stop(View view){
      myAudioRecorder.stop();
      myAudioRecorder.release();
      myAudioRecorder  = null;
      stop.setEnabled(false);
      play.setEnabled(true);
      Toast.makeText(getApplicationContext(), "Audio recorded successfully",
      Toast.LENGTH_LONG).show();
   }
   @Override
   public boolean onCreateOptionsMenu(Menu menu) {
      // Inflate the menu; this adds items to the action bar if it is present.
      getMenuInflater().inflate(R.menu.main, menu);
      return true;
   }
   public void play(View view) throws IllegalArgumentException,
   SecurityException, IllegalStateException, IOException{

   MediaPlayer m = new MediaPlayer();
   m.setDataSource(outputFile);
   m.prepare();
   m.start();
   Toast.makeText(getApplicationContext(), "Playing audio", Toast.LENGTH_LONG).show();

   }

}
Here is the content of activity_main.xml
<RelativeLayout xmlns:android="http://schemas.android.com/apk/res/android"
   xmlns:tools="http://schemas.android.com/tools"
   android:layout_width="match_parent"
   android:layout_height="match_parent"
   android:paddingBottom="@dimen/activity_vertical_margin"
   android:paddingLeft="@dimen/activity_horizontal_margin"
   android:paddingRight="@dimen/activity_horizontal_margin"
   android:paddingTop="@dimen/activity_vertical_margin"
   tools:context=".MainActivity" >

   <TextView
      android:id="@+id/textView1"
      android:layout_width="wrap_content"
      android:layout_height="wrap_content"
      android:layout_alignParentLeft="true"
      android:layout_alignParentRight="true"
      android:layout_alignParentTop="true"
      android:layout_marginTop="32dp"
      android:text="@string/Recording"
      android:textAppearance="?android:attr/textAppearanceMedium" />

   <ImageView
      android:id="@+id/imageView1"
      android:layout_width="100dp"
      android:layout_height="100dp"
      android:layout_below="@+id/textView1"
      android:layout_centerHorizontal="true"
      android:layout_marginTop="37dp"
      android:scaleType="fitXY"
      android:src="@android:drawable/presence_audio_online" />

   <Button
      android:id="@+id/button1"
      android:layout_width="wrap_content"
      android:layout_height="wrap_content"
      android:layout_below="@+id/imageView1"
      android:layout_marginTop="67dp"
      android:layout_toLeftOf="@+id/imageView1"
      android:onClick="start"
      android:text="@string/start" />

   <Button
      android:id="@+id/button2"
      android:layout_width="wrap_content"
      android:layout_height="wrap_content"
      android:layout_alignBaseline="@+id/button1"
      android:layout_alignBottom="@+id/button1"
      android:layout_alignRight="@+id/textView1"
      android:layout_marginRight="40dp"
      android:onClick="stop"
      android:text="@string/stop" />

   <Button
      android:id="@+id/button3"
      style="?android:attr/buttonStyleSmall"
      android:layout_width="wrap_content"
      android:layout_height="wrap_content"
      android:layout_below="@+id/button2"
      android:layout_centerHorizontal="true"
      android:onClick="play"
      android:text="@string/play" />

</RelativeLayout>
Here is the content of Strings.xml
<?xml version="1.0" encoding="utf-8"?>
<resources>

   <string name="app_name">AudioCapture</string>
   <string name="action_settings">Settings</string>
   <string name="hello_world">Hello world!</string>
   <string name="Recording">Android Audio Recording Application</string>
   <string name="start">start</string>
   <string name="stop">stop</string>
   <string name="play">play</string>

</resources>
Here is the content of AndroidManifest.xml
<?xml version="1.0" encoding="utf-8"?>
<manifest xmlns:android="http://schemas.android.com/apk/res/android"
   package="com.example.audiocapture"
   android:versionCode="1"
   android:versionName="1.0" >

   <uses-sdk
      android:minSdkVersion="10"
      android:targetSdkVersion="17" />
      <uses-permission android:name="android.permission.WRITE_EXTERNAL_STORAGE"/>
   <uses-permission android:name="android.permission.RECORD_AUDIO" />

   <application
      android:allowBackup="true"
      android:icon="@drawable/ic_launcher"
      android:label="@string/app_name"
      android:theme="@style/AppTheme" >
      <activity
         android:name="com.example.audiocapture.MainActivity"
         android:label="@string/app_name" >
         <intent-filter>
            <action android:name="android.intent.action.MAIN" />

            <category android:name="android.intent.category.LAUNCHER" />
         </intent-filter>
      </activity>
   </application>

</manifest>
Let's try to run your AndroidCapture application. I assume you have connected your actual Android Mobile device with your computer. To run the app from Eclipse, open one of your project's activity files and click Run  icon from the toolbar. Before starting your application, Eclipse will display following window to select an option where you want to run your Android application.
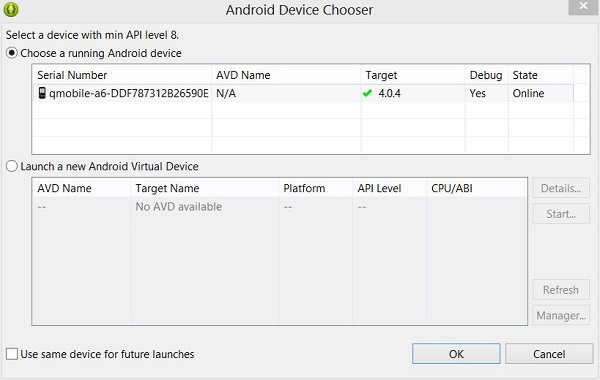
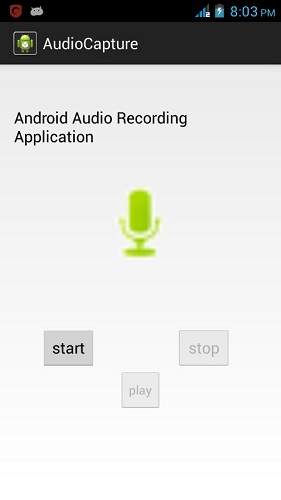
Select your mobile device as an option and then check your mobile device which will display following screen:
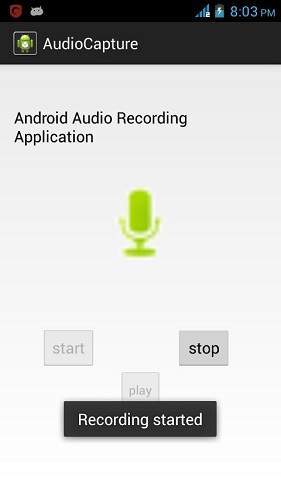
Now by default you will see stop and play button disable. Just press the start button and your application will start recording the audio. It will display the following screen.
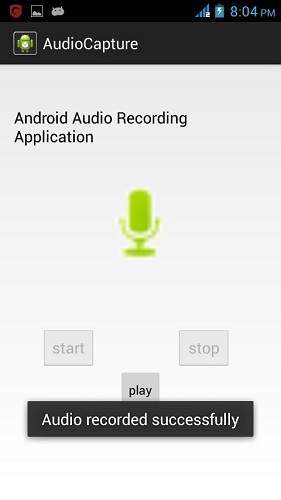
Now just press stop button and it will save the recorded audio to external sd card. When you click on stop button , the following screen would appear.
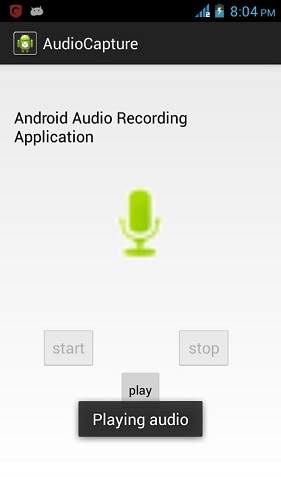
Now just press the play button and and recorded audio will just start playing on the device. The following message appears when you click on play button.
This example provides demonstration of MediaRecorder class to capture audio and then MediaPlayer class to play that recorded audio.
To experiment with this example , you need to run this on an actual device.
| Steps | Description |
|---|---|
| 1 | You will use Eclipse IDE to create an Android application and name it as AudioCapture under a package com.example.audiocapture. While creating this project, make sure you Target SDK and Compile With at the latest version of Android SDK to use higher levels of APIs. |
| 2 | Modify src/MainActivity.java file to add AudioCapture code |
| 3 | Modify layout XML file res/layout/activity_main.xml add any GUI component if required. |
| 4 | Modify res/values/string.xml file and add necessary string components. |
| 5 | Modify AndroidManifest.xml to add necessary permissions. |
| 6 | Run the application and choose a running android device and install the application on it and verify the results. |
Here is the content of src/com.example.audiocapture/MainActivity.java
package com.example.audiocapture; import java.io.File; import java.io.IOException; import android.media.MediaPlayer; import android.media.MediaRecorder; import android.os.Bundle; import android.os.Environment; import android.app.Activity; import android.view.Menu; import android.view.View; import android.widget.Button; import android.widget.Toast; public class MainActivity extends Activity { private MediaRecorder myAudioRecorder; private String outputFile = null; private Button start,stop,play; @Override protected void onCreate(Bundle savedInstanceState) { super.onCreate(savedInstanceState); setContentView(R.layout.activity_main); start = (Button)findViewById(R.id.button1); stop = (Button)findViewById(R.id.button2); play = (Button)findViewById(R.id.button3); stop.setEnabled(false); play.setEnabled(false); outputFile = Environment.getExternalStorageDirectory(). getAbsolutePath() + "/myrecording.3gp";; myAudioRecorder = new MediaRecorder(); myAudioRecorder.setAudioSource(MediaRecorder.AudioSource.MIC); myAudioRecorder.setOutputFormat(MediaRecorder.OutputFormat.THREE_GPP); myAudioRecorder.setAudioEncoder(MediaRecorder.OutputFormat.AMR_NB); myAudioRecorder.setOutputFile(outputFile); } public void start(View view){ try { myAudioRecorder.prepare(); myAudioRecorder.start(); } catch (IllegalStateException e) { // TODO Auto-generated catch block e.printStackTrace(); } catch (IOException e) { // TODO Auto-generated catch block e.printStackTrace(); } start.setEnabled(false); stop.setEnabled(true); Toast.makeText(getApplicationContext(), "Recording started", Toast.LENGTH_LONG).show(); } public void stop(View view){ myAudioRecorder.stop(); myAudioRecorder.release(); myAudioRecorder = null; stop.setEnabled(false); play.setEnabled(true); Toast.makeText(getApplicationContext(), "Audio recorded successfully", Toast.LENGTH_LONG).show(); } @Override public boolean onCreateOptionsMenu(Menu menu) { // Inflate the menu; this adds items to the action bar if it is present. getMenuInflater().inflate(R.menu.main, menu); return true; } public void play(View view) throws IllegalArgumentException, SecurityException, IllegalStateException, IOException{ MediaPlayer m = new MediaPlayer(); m.setDataSource(outputFile); m.prepare(); m.start(); Toast.makeText(getApplicationContext(), "Playing audio", Toast.LENGTH_LONG).show(); } }
Here is the content of activity_main.xml
<RelativeLayout xmlns:android="http://schemas.android.com/apk/res/android" xmlns:tools="http://schemas.android.com/tools" android:layout_width="match_parent" android:layout_height="match_parent" android:paddingBottom="@dimen/activity_vertical_margin" android:paddingLeft="@dimen/activity_horizontal_margin" android:paddingRight="@dimen/activity_horizontal_margin" android:paddingTop="@dimen/activity_vertical_margin" tools:context=".MainActivity" > <TextView android:id="@+id/textView1" android:layout_width="wrap_content" android:layout_height="wrap_content" android:layout_alignParentLeft="true" android:layout_alignParentRight="true" android:layout_alignParentTop="true" android:layout_marginTop="32dp" android:text="@string/Recording" android:textAppearance="?android:attr/textAppearanceMedium" /> <ImageView android:id="@+id/imageView1" android:layout_width="100dp" android:layout_height="100dp" android:layout_below="@+id/textView1" android:layout_centerHorizontal="true" android:layout_marginTop="37dp" android:scaleType="fitXY" android:src="@android:drawable/presence_audio_online" /> <Button android:id="@+id/button1" android:layout_width="wrap_content" android:layout_height="wrap_content" android:layout_below="@+id/imageView1" android:layout_marginTop="67dp" android:layout_toLeftOf="@+id/imageView1" android:onClick="start" android:text="@string/start" /> <Button android:id="@+id/button2" android:layout_width="wrap_content" android:layout_height="wrap_content" android:layout_alignBaseline="@+id/button1" android:layout_alignBottom="@+id/button1" android:layout_alignRight="@+id/textView1" android:layout_marginRight="40dp" android:onClick="stop" android:text="@string/stop" /> <Button android:id="@+id/button3" style="?android:attr/buttonStyleSmall" android:layout_width="wrap_content" android:layout_height="wrap_content" android:layout_below="@+id/button2" android:layout_centerHorizontal="true" android:onClick="play" android:text="@string/play" /> </RelativeLayout>
Here is the content of Strings.xml
<?xml version="1.0" encoding="utf-8"?> <resources> <string name="app_name">AudioCapture</string> <string name="action_settings">Settings</string> <string name="hello_world">Hello world!</string> <string name="Recording">Android Audio Recording Application</string> <string name="start">start</string> <string name="stop">stop</string> <string name="play">play</string> </resources>
Here is the content of AndroidManifest.xml
<?xml version="1.0" encoding="utf-8"?>
<manifest xmlns:android="http://schemas.android.com/apk/res/android"
package="com.example.audiocapture"
android:versionCode="1"
android:versionName="1.0" >
<uses-sdk
android:minSdkVersion="10"
android:targetSdkVersion="17" />
<uses-permission android:name="android.permission.WRITE_EXTERNAL_STORAGE"/>
<uses-permission android:name="android.permission.RECORD_AUDIO" />
<application
android:allowBackup="true"
android:icon="@drawable/ic_launcher"
android:label="@string/app_name"
android:theme="@style/AppTheme" >
<activity
android:name="com.example.audiocapture.MainActivity"
android:label="@string/app_name" >
<intent-filter>
<action android:name="android.intent.action.MAIN" />
<category android:name="android.intent.category.LAUNCHER" />
</intent-filter>
</activity>
</application>
</manifest>
Let's try to run your AndroidCapture application. I assume you have connected your actual Android Mobile device with your computer. To run the app from Eclipse, open one of your project's activity files and click Run icon from the toolbar. Before starting your application, Eclipse will display following window to select an option where you want to run your Android application.
icon from the toolbar. Before starting your application, Eclipse will display following window to select an option where you want to run your Android application.
Select your mobile device as an option and then check your mobile device which will display following screen:
Now by default you will see stop and play button disable. Just press the start button and your application will start recording the audio. It will display the following screen.
Now just press stop button and it will save the recorded audio to external sd card. When you click on stop button , the following screen would appear.
Now just press the play button and and recorded audio will just start playing on the device. The following message appears when you click on play button.